목표
- 이더리움 기반의 Priviate 환경을 구축
- docker 기반으로 서비스를 구성
- PoA 알고리즘을 사용
- 멀티 노드를 구성
- 블록체인 모니터링 환경을 구성
- 스마트 컨트랙트를 배포하고 활용
개발환경
| 사용 | 설명 |
|---|---|
| geth | Ethereum CLI client |
| eth-netstats | 노드 모니터링 GUI |
| blockscout | 블록 및 트랜잭션 모니터링 GUI |
| remix | 스마트컨트랙트 편집 툴 |
| nodejs | 스마트컨트랙트 통신을 위해 이용 (WEB3) |
| docker | 컨테이너 기반 서비스로 docker를 활용 |
| vscode | 소스 편집에 사용 |
프로젝트 가져오기
1
git clone https://github.com/niceharu/surfchain.git
주요 파일 구성은 다음과 같다.
| 파일명 | 설명 | 참조 파일 |
|---|---|---|
| docker-compose.yml | geth 및 eth-netstats 실행 | |
| geth-account-new.yml | geth 계정 생성 | password |
| geth-account-list.yml | geth 계정 목록 조회 | |
| geth-init.yml | geth 데이터 초기화 셋팅 | genesis.json |
| data-sample/genesis.json | genesis.json 샘플 파일 | |
| data-sample/password | 비밀번호 샘플 파일 | |
| docker-compose-blockscout.yml | blockscout 실행 | common-blockscout.env |
geth 환경 설정
먼저 저장소 생성이 필요하다. 데이터 샘플 폴더를 복사하여 첫 번째 노드의 저장소(data-node1)을 생성한다.
1
cp -R data-sample data-node1
/data-node1/password 파일에 신규로 생성할 계정의 비밀번호를 입력한다.
1
11111
geth-account-new.yml 에 저장소 경로를 설정한다.
1
2
3
4
5
6
version: '2'
services:
init:
image: ethereum/client-go
command: account new --password="/root/.ethereum/password"
volumes: - ./data-node1:/root/.ethereum
계정 생성 명령을 실행한다.
1
2
3
4
5
6
7
8
9
10
11
docker-compose -f geth-account-new.yml up

init_1  | Your new key was generated
init_1  |
init_1  | Public address of the key: 0x3c1bcAd30d646265E5aAFC7145295f84cA88e700
init_1  | Path of the secret key file: /root/.ethereum/keystore/UTC--2022-04-27T07-51-00.789909280Z--3c1bcad30d646265e5aafc7145295f84ca88e700
init_1  |
init_1  | - You can share your public address with anyone. Others need it to interact with you.
init_1  | - You must NEVER share the secret key with anyone! The key controls access to your funds!
init_1  | - You must BACKUP your key file! Without the key, it's impossible to access account funds!
init_1  | - You must REMEMBER your password! Without the password, it's impossible to decrypt the key!
계정 목록 조회 명령을 통해 생성된 계정 목록을 확인 할 수 있다.
1
2
3
4
5
6
7
8
docker-compose -f geth-account-list.yml up

init_1  | INFO [04-27|07:53:04.274] Maximum peer count                       ETH=50 LES=0 total=50
init_1  | INFO [04-27|07:53:04.274] Smartcard socket not found, disabling    err="stat /run/pcscd/pcscd.comm: no such file or directory"
init_1  | WARN [04-27|07:53:04.286] Sanitizing cache to Go's GC limits       provided=1024 updated=662
init_1  | INFO [04-27|07:53:04.286] Set global gas cap                       cap=50,000,000
init_1  | Account #0: {3c1bcad30d646265e5aafc7145295f84ca88e700} keystore:///root/.ethereum/keystore/UTC--2022-04-27T07-51-00.789909280Z--3c1bcad30d646265e5aafc7145295f84ca88e700
init_1  | Account #1: {d9e76f59552ea2ad734c765031dc8cdd2cf659fe} keystore:///root/.ethereum/keystore/UTC--2022-04-27T07-52-58.917090933Z--d9e76f59552ea2ad734c765031dc8cdd2cf659fe
/data-node1/genesis.json 에 아래 계정을 신규로 생성한 계정으로 변경해준다.
아래 extraData부분에 계정을 입력해 두면 PoA 방식을 사용할때 블록검증자로써의 역할을 하게된다.
권위증명(PoA, Proof of Authority)이란 권위있는 기관(미리 지정한 블록 검증자)에서 조건에 맞는 노드를 증명해 이들간 합의를 이루는 방식의 합의 알고리즘이다.
1
2
3
4
5
6
7
8
9
10
11
12
13
14
15
16
17
18
19
20
21
22
23
24
25
26
27
28
29
30
31
32
33
34
 {
   "config": {
       "chainId": 2731,
       "homesteadBlock": 0,
       "eip150Block": 0,
       "eip155Block": 0,
       "eip158Block": 0,
       "byzantiumBlock": 0,
       "constantinopleBlock": 0,
       "petersburgBlock": 0,
       "istanbulBlock": 0,
       "clique": {
           "period": 5,
           "epoch": 30000
       }
   },
   "nonce": "0x0",
   "timestamp": "0x5a722c92",
   "extraData": "0x00000000000000000000000000000000000000000000000000000000000000003c1bcad30d64
 6265e5aafc7145295f84ca88e7000000000000000000000000000000000000000000000000000000000000000000
 000000000000000000000000000000000000000000000000000000000000000000",
   "gasLimit": "8000000",
   "difficulty": "0x1",
   "mixHash": "0x0000000000000000000000000000000000000000000000000000000000000000",
   "coinbase": "0x0000000000000000000000000000000000000000",
   "alloc": {
     "3c1bcad30d646265e5aafc7145295f84ca88e700": {
       "balance": "1000000000000000000000000"
     }
   },
   "number": "0x0",
   "gasUsed": "0x0",
   "parentHash": "0x0000000000000000000000000000000000000000000000000000000000000000"
 }
geth-init.yml 에 데이터 경로를 변경해준다.
1
2
3
4
5
6
7
 version: '2'
 services:
   init:
     image: ethereum/client-go
     command: init /root/.ethereum/genesis.json
     volumes:
       - ./data-node1:/root/.ethereum
초기화 명령을 실행한다.
1
docker-compose -f ./geth-init.yml up
이제 두번째 노드를 구성하자. data-node2 폴더를 만들고 data-node1에 앞서 만든 genesis.json 을 복사해 온다.
1
2
mkdir data-node2
copy data-node1/genesis.json data-node2
geth-init.yml 에 데이터 경로를 변경해준다.
1
2
3
4
5
6
7
version: '2'
services:
  init:
    image: ethereum/client-go
    command: init /root/.ethereum/genesis.json
    volumes:
      - ./data-node2:/root/.ethereum
초기화 명령을 실행한다.
1
docker-compose -f ./geth-init.yml up
이제 멀티 노드 실행을 위한 docker-compose.yml 을 설정해 준다.
계정 및 데이터 저장소 위치를 알맞게 넣어준다. 네트워크 정보도 필요하다면 변경해 준다.
1
2
3
4
5
6
7
8
9
10
11
12
13
14
15
16
17
18
19
20
21
22
23
24
25
26
27
28
29
30
31
32
33
34
35
36
37
38
39
40
41
42
43
44
45
46
47
48
49
50
51
52
53
54
55
56
57
58
59
60
61
62
63
64
65
66
67
68
69
70
71
72
73
74
75
76
77
78
79
80
81
 version: '2'
 services:
   node1:
     image: ethereum/client-go
     container\_name: node1
     command:
       --networkid=2731
       --port=30303
       --maxpeers=10
       --allow-insecure-unlock
       --nodiscover
       --http
       --http.addr="0.0.0.0"
       --http.port=8545
       --http.corsdomain="\*"
       --http.api="admin, debug, web3, eth, txpool, personal, ethash, miner, net"
       --unlock="3c1bcad30d646265e5aafc7145295f84ca88e700"
       --password="/root/.ethereum/password"
       --miner.etherbase="3c1bcad30d646265e5aafc7145295f84ca88e700"
       --ethstats="node1:SURF@eth-netstats:3000"
       --gcmode="archive"
       --syncmode="full"
       --mine
       --miner.threads=1
       --miner.gasprice=0
     volumes:
       - ./data-node1:/root/.ethereum:rw
     ports:
       - "30303:30303" # peer 연결용
       - "30303:30303/udp" # peer 연결용
       - "8545:8545"   # remix 연결용
     networks:
       priv-eth-net:
         ipv4\_address: 172.15.200.2

   node2:
     image: ethereum/client-go
     container\_name: node2
     depends\_on:
       - node1
     command:
       --networkid=2731
       --port=30304
       --maxpeers=10
       --allow-insecure-unlock
       --nodiscover
       --http
       --http.addr="0.0.0.0"
       --http.port=8546
       --http.corsdomain="\*"
       --http.api="admin, debug, web3, eth, txpool, personal, ethash, miner, net"
       --ethstats="node2:SURF@eth-netstats:3000"
     volumes:
       - ./data-node2:/root/.ethereum:rw
     ports:
       - "30304:30304" # peer 연결용
       - "30304:30304/udp" # peer 연결용
       - "8546:8546"   # remix 연결용
     networks:
       priv-eth-net:
         ipv4\_address: 172.15.200.3

   eth-netstats:
     image: kamael/eth-netstats
     container\_name: eth-netstats
     depends\_on:
       - node1
     ports:
       - "3002:3000" # 네트워크 모니터링
     environment:
       - WS\_SECRET=SURF
     networks:
       priv-eth-net:
         ipv4\_address: 172.15.200.4

 networks:
   priv-eth-net:
     driver: bridge
     ipam:
       config:
       - subnet: 172.15.200.0/28
geth 실행
1
docker-compose up -d
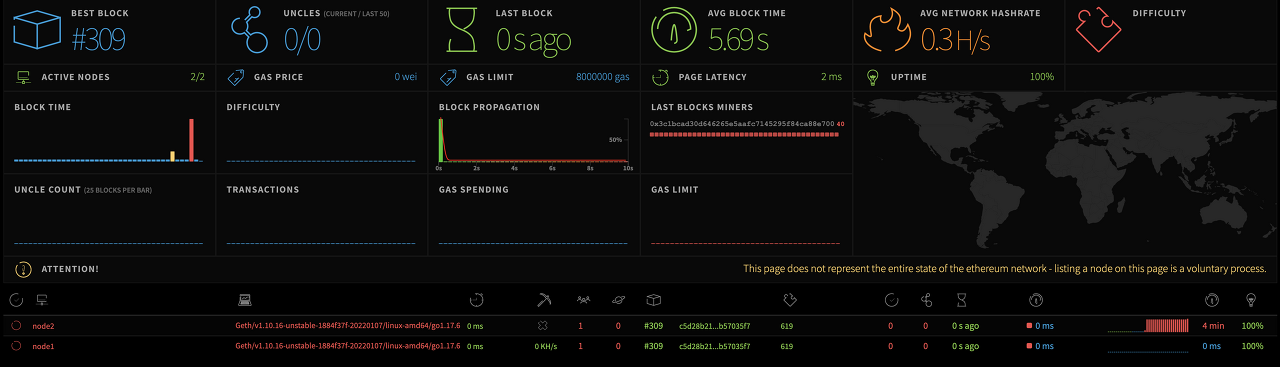
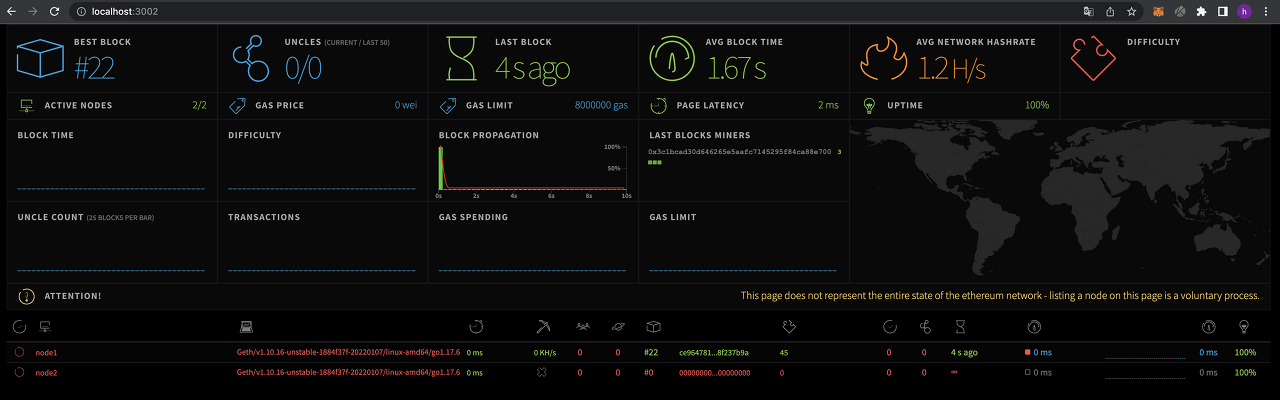
eth-netstats에 접속(http://localhost:3002)하여 노드 정보를 확인해 본다.
node2는 동작하고 있지 않음을 알 수 있다. 이제 node1 과 node2의 연결을 해주자.
node 간 연결
node1의 네트워크 정보를 먼저 가져온다.
1
2
3
4
docker exec -it node1 /bin/sh
# geth attach
> admin.nodeInfo.enode
"enode://8fd82f9fc8039cc9c36d407ed6789e366189a369cb8165244ab74e214012ba2e96fa7eee2c20ec6c4ff67102b70296c263fa70d68134bd2d7aac290e14a2a1ac@127.0.0.1:30303?discport=0"
node2 에 접속하여 node1과 연결 시켜준다.
admin.addPeer() 를 통해 노드를 추가한다. 이때 아이피 및 포트는 node1의 정보를 입력한다.
1
2
enode://8fd82f9fc8039cc9c36d407ed6789e366189a369cb8165244ab74e214012ba2e96fa7eee2c20ec6c4ff67102b
70296c263fa70d68134bd2d7aac290e14a2a1ac@172.15.200.2:30303?discport=0
admin.peers 를 통해 현재 연결된 노드의 정보를 알 수 있다.
1
2
3
4
5
6
7
8
9
10
11
12
13
14
15
16
17
18
19
20
21
22
23
24
25
26
27
28
29
docker exec -it node2 /bin/sh
# geth attach
> admin.addPeer("enode://8fd82f9fc8039cc9c36d407ed6789e366189a369cb8165244ab74e214012ba2e96fa7eee2c20ec6c4ff67102b70296c263fa70d68134bd2d7aac290e14a2a1ac@172.15.200.2:30303?discport=0")
true
> admin.peers
[{
    caps: ["eth/66", "snap/1"],
    enode: "enode://8fd82f9fc8039cc9c36d407ed6789e366189a369cb8165244ab74e214012ba2e96fa7eee2c20ec6c4ff67102b70296c263fa70d68134bd2d7aac290e14a2a1ac@172.15.200.2:30303?discport=0",
    id: "e058a6fd820ca7169c4a6f7e421f7861165646db539cd132d1cad36d5bc59013",
    name: "Geth/v1.10.16-unstable-1884f37f-20220107/linux-amd64/go1.17.6",
    network: {
      inbound: false,
      localAddress: "172.15.200.3:56900",
      remoteAddress: "172.15.200.2:30303",
      static: true,
      trusted: false
    },
    protocols: {
      eth: {
        difficulty: 451,
        head: "0x68e48f8215fcbb16dc949b4f0e4902c972e8d028c9ad0ee227410e4b46fac53b",
        version: 66
      },
      snap: {
        version: 1
      }
    }
}]
>
모니터링 화면에서 두 개의 노드가 성공적으로 연결된 것을 확인 할 수 있다.